
This article outlines steps for sharing and managing calendar permissions as well details on the permissions available.
Sharing your Outlook Calendar
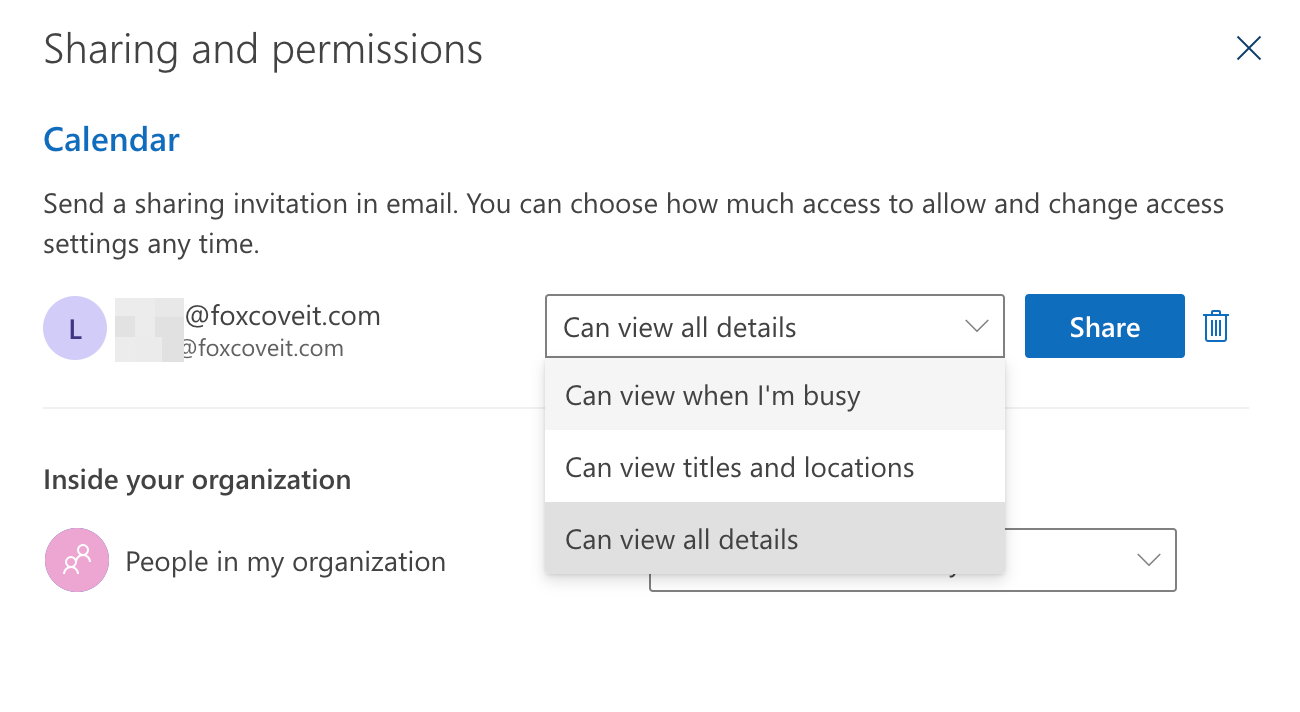
Sharing Permissions:
-
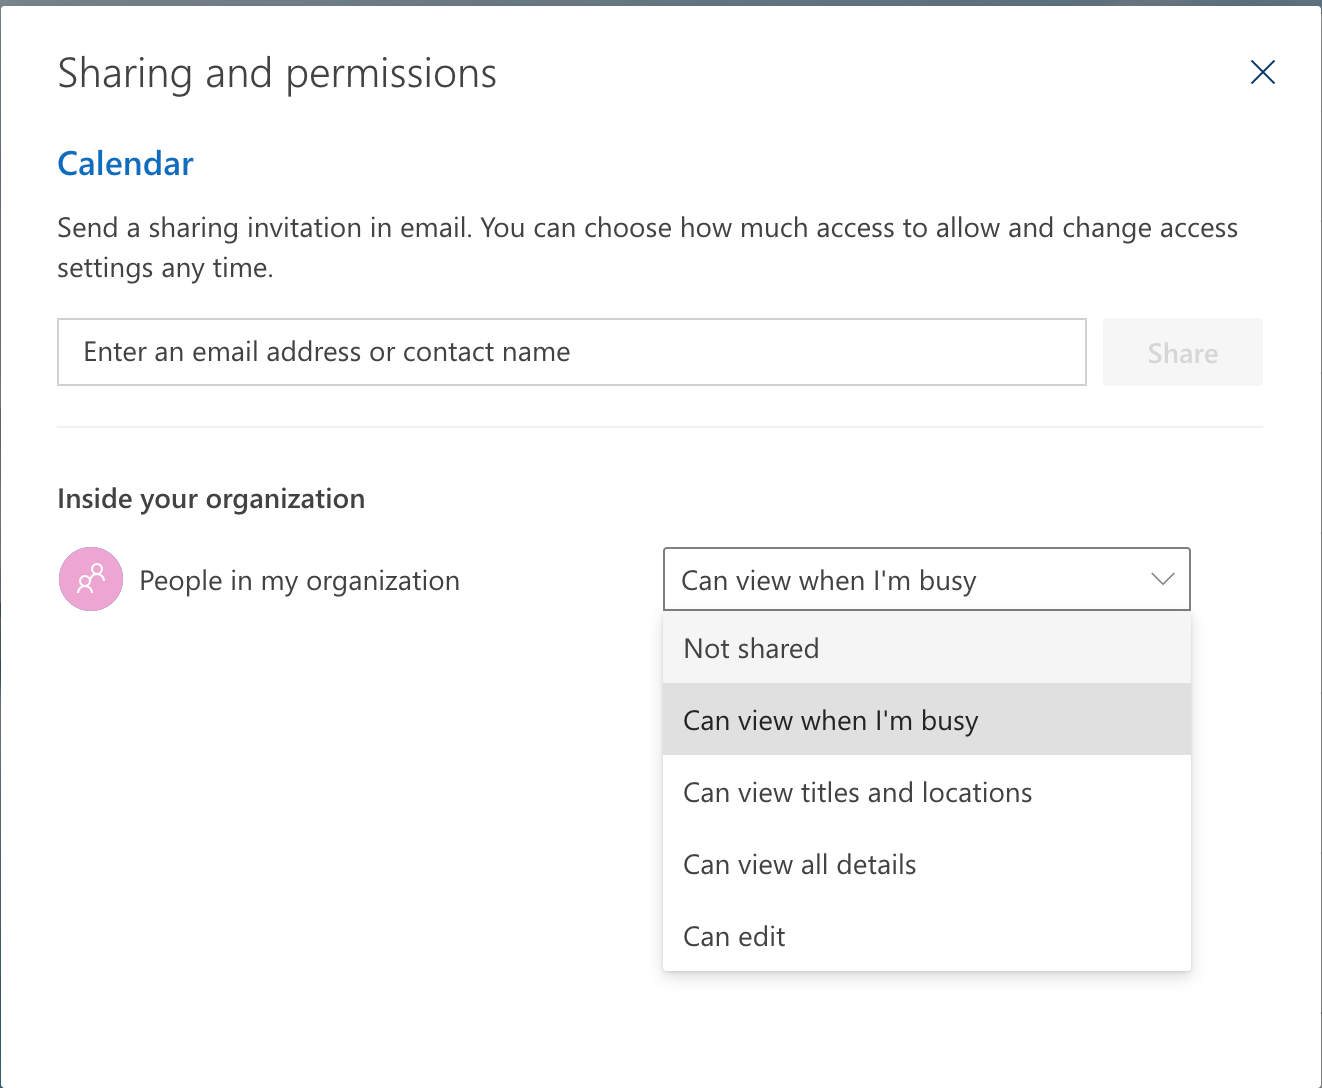
Select Can view when I'm busy to give them permission to see only when you are busy, but not the details of items on your calendar.
-
Select Can view titles and locations to give them permission to see when you're busy, plus the titles and locations of items on your calendar.
-
Select Can view all details to give them permission to see all details of items on your calendar. This option allows others to view your calendar but not make changes to it.
Sharing your calendar:
In general, you are able to view/edit the permissions granted to your organization or specific users to your own calendars by following below.
-
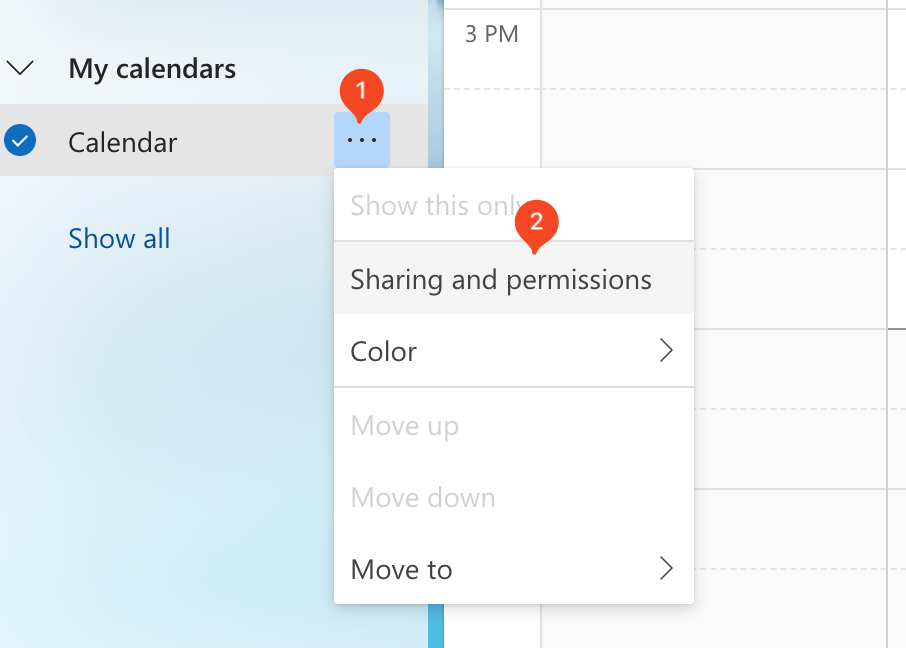
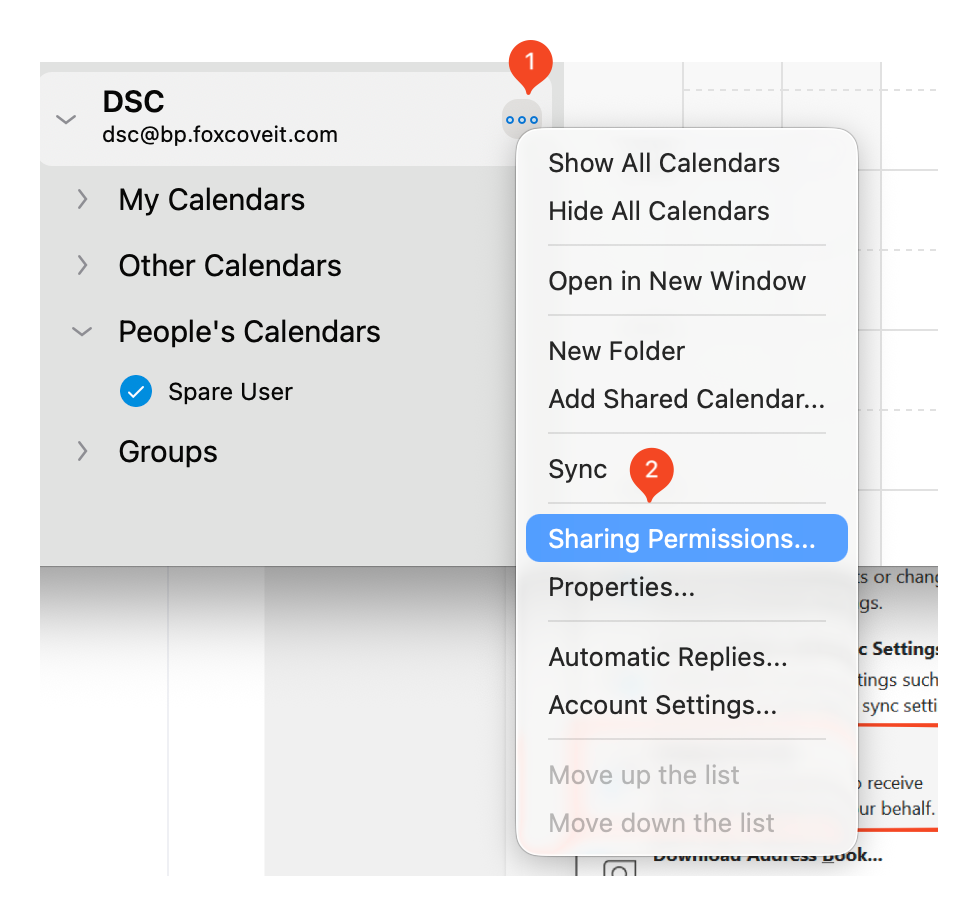
Open Outlook and navigate to your calendar. Click the 3 dots or right click to open the menu > sharing and permissions
|
|
-
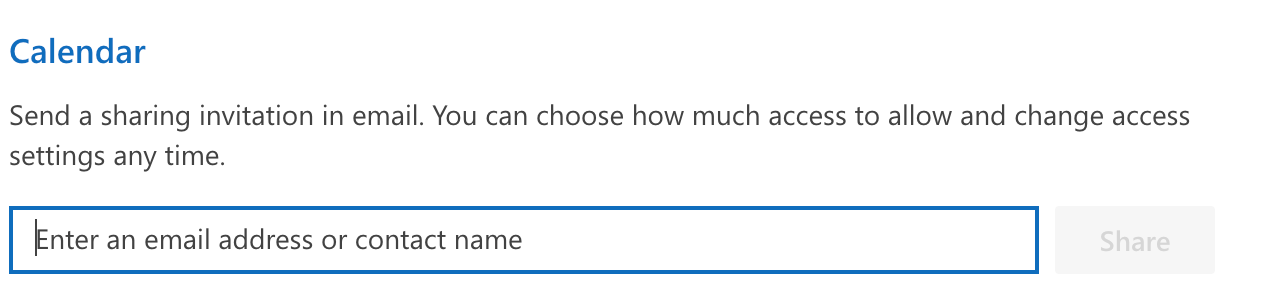
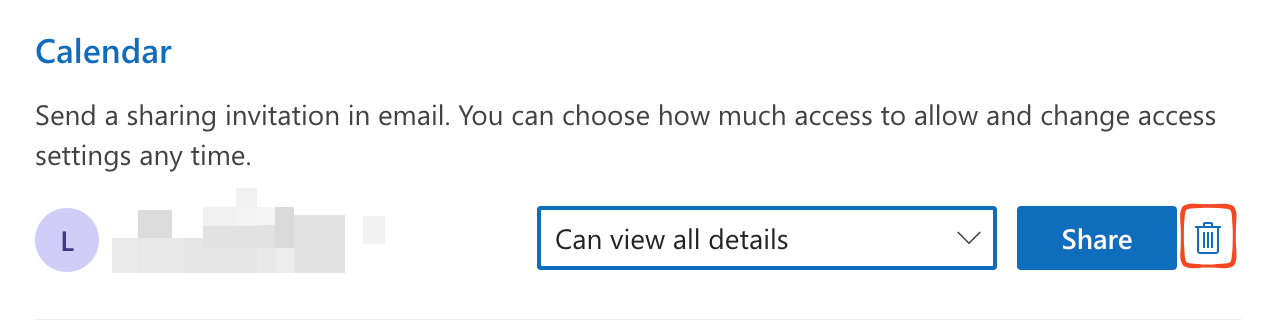
Add a users email address and you’ll see the permissions available
-
-
Remove access by clicking the trash icon next to the “share” button
-
You can adjust the existing permissions across your organization too
Delegate Access
What's the difference between edit permissions and delegate permissions?
-
Editors can be assigned to your primary calendar (named "Calendar") or to any additional calendars that you created.
-
Delegates can only be assigned to your primary calendar. Delegates can schedule and respond to meetings on your behalf.
The options Can view when I'm busy, Can view titles and locations, and Can view all details allow others to view your calendar but not make changes to it. Access for people from outside your organization is limited to these options.
New Outlook / Outlook for Mac
In new Outlook you can grant anyone within your organization editor or delegate access to your calendar.
Assign delegate permissions
Delegates can not only edit your calendar, but they can also schedule and respond to meetings on your behalf.
-
In the new Outlook navigation pane, select Calendar.
-
From the Home tab, select Share Calendar.
-
In the Sharing and permissions page, type the name or email address of the person you want to share your calendar with and assign delegate access. Though you can share your calendar with more than one person, you can only add one person at a time from Outlook on the web.
-
After you've added the person you want to manage your calendar, select the drop-down list next to their name, and choose the level of access you want them to have.
-
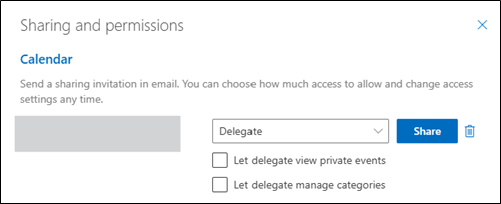
Select Delegate to give them the same permission as an editor, plus they will receive meeting requests and responses on your behalf. To allow the delegate to see events on your calendar you marked Private, select the checkbox for Let delegate view private events. To allow the delegate to manage your categories, select the checkbox for Let delegate manage categories.
-
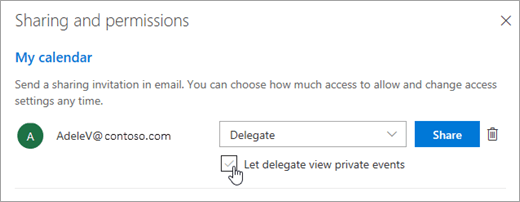
Note: Calendar items marked Private are protected. Most people you share your calendar with see only the time of items marked Private, not the subject, location, or other details. The exception to this is if you select the Let delegate view private events check box.
-
After you've finished adding the person you want to share your calendar with and have chosen which permission you want to give them, select Share. If you decide not to share your calendar right now, select Remove
-
The person you shared your calendar with will receive an email message telling them about it. When they select the Accept button in the invitation, it will add your calendar to their list of calendars.
-
After you've given someone delegate access to your calendar, you'll see an additional option in Sharing and permissions that lets you control how meeting requests and responses are processed. If you have multiple delegates, you'll need to do this for each of your delegates.
-
Under Delegates, next to Send invitations and responses to, select one of the following options:
-
Delegate only Meeting requests and responses go only to your delegates.
-
Delegate and send me a copy Meeting requests and responses are sent to you and your delegates. Only your delegates see the option to accept or decline a meeting request, and the notification sent to you will appear like a normal email message. You can still respond to the meeting by opening the calendar item and responding.
-
Both my delegate and me Meeting requests and responses are sent both to you and your delegates. Either of you can respond to the meeting invitation.
-
-
If you decide not to share your calendar with someone, under Delegates select Remove for the person you no longer want to act as a delegate.
-
Outlook Web App
Assign delegate permissions
Delegate can not only edit your calendar, but also schedule and respond to meetings on your behalf.
-
In Outlook on the web, from the navigation pane, select Calendar.
-
From the Home tab, select Share Calendar.
-
In the Sharing and permissions page, type the name or email address of the person you want to share your calendar with and assign delegate access. Though you can share your calendar with more than one person, you can only add one person at a time from Outlook on the web.
-
After you've added the person you want to manage your calendar, select the drop-down list next to their name, and choose the level of access you want them to have.
-
Select Delegate to give them the same permission as an editor, plus they will receive meeting requests and responses on your behalf. To allow the delegate to see events on your calendar you marked Private, select the check box for Let delegate view private events.
Note: Calendar items marked Private are protected. Most people you share your calendar with see only the time of items marked Private, not the subject, location, or other details. The exception to this is if you select the Let delegate view private events check box.
-
-
After you've finished adding the person you want to share your calendar with and have chosen which permission you want to give them, select Share. If you decide not to share your calendar right now, select Remove.
The person you shared your calendar with will receive an email message telling them about it. When they select the Accept button in the invitation, it will add your calendar to their list of calendars.
-
After you've given someone delegate access to your calendar, you'll see an additional option in Sharing and permissions that lets you control how meeting requests and responses are processed. If you have multiple delegates, you'll need to do this for each of your delegates.
-
Under Delegates, next to Send invitations and responses to, select one of the following options:
-
Delegate only Meeting requests and responses go only to your delegates.
-
Delegate and send me a copy Meeting requests and responses are sent to you and your delegates. Only your delegates see the option to accept or decline a meeting request, and the notification sent to you will appear like a normal email message. You can still respond to the meeting by opening the calendar item and responding.
-
Both my delegate and me Meeting requests and responses are sent both to you and your delegates. Either of you can respond to the meeting invitation.
-
-
If you decide not to share your calendar with someone, under Delegates select Remove for the person you no longer want to act as a delegate.
Outlook Classic - PC
Assign delegate permissions
A delegate automatically receives Send on Behalf permissions. By default, the delegate can read only your meeting requests and responses. The delegate isn't granted permission to read other messages in your Inbox.
-
In classic Outlook, select the File tab, then select Account Settings > Delegate Access.
-
In the dialog, select Add.
-
If Add doesn't appear, an active connection might not exist between Outlook and Exchange. The Outlook status bar displays the connection status.
-
-
Type the name of the person whom you want to designate as your delegate, or search for and then select the name in the search results list.
-
Note: The delegate must be a person in your organization's Exchange Global Address List (GAL).
-
-
Select Add, then select OK.
-
In the Delegate Permissions dialog box, accept the default permission settings or select custom access levels for Exchange folders.
-
If a delegate needs permission to work only with meeting requests and responses, the default permission settings, such as Delegate receives copies of meeting-related messages sent to me, are sufficient. You can leave the Inbox permission setting at None. Meeting requests and responses will go directly to the delegate's Inbox.
-
Note: By default, the delegate is granted Editor (can read, create, and modify items) permission to your Calendar folder. When the delegate responds to a meeting on your behalf, it is automatically added to your Calendar folder.
-
-
To send a message to notify the delegate of the changed permissions, select the Automatically send a message to delegate summarizing these permissions check box.
-
If you want, select the Delegate can see my private items check box.
Important: This setting affects all Exchange folders. This includes all Mail, Contacts, Calendar, Tasks, Notes, and Journal folders. There is no way to grant access to private items in only specified folders.
-
Select OK.
Notes: Messages sent with Send on Behalf permissions include both the delegate's and your names next to From. When a message is sent with Send As permissions, only your name appears.
Once you add someone as a delegate, they can add your Exchange mailbox to their Outlook profile. For instructions, see managing someone's inbox and managing someone's calendar
Change permissions for a delegate
-
In classic Outlook, select the File tab, then select Account Settings > Delegate Access.
-
Select the name of the delegate for whom you want to change permissions, and then select Permissions.
Note: If you want to remove all Delegate Access permissions, don't select Permissions but instead select Remove and skip the rest of these steps.
-
Change the permissions for any Outlook folder that the delegate has access to.
-
To send a message to notify the delegate of the changed permissions, select the Automatically send a message to delegate summarizing these permissions check box.
Note: If you want copies of meeting requests and responses that you receive to be sent to a delegate, ensure that the delegate is assigned Editor (can read, create, and modify items) permission to your Calendar folder, and then select the Delegate receives copies of meeting-related messages sent to me check box.
Change delegate access to private items
If you have assigned permissions to a delegate so they can access your Outlook folders, you can hide personal information in appointments, meetings, tasks, and contacts. Open each personal item, and in the Tags group, select Private.
To grant access to your private items, do the following:
-
In classic Outlook, select the File tab, then select Account Settings > Delegate Access.
-
Select the name of the delegate for whom you want to change access to your private appointments, and then select Permissions.
-
Select the Delegate can see my private items check box.
Important: You shouldn't rely on the Private feature to prevent other people from accessing the details of your appointments, contacts, or tasks. To ensure that other people can't read the items that you marked as private, don't grant them Reviewer (can read items) permission to your Calendar, Contacts, or Tasks folder.